
Adopting new software can turn into a daunting task in a blink of an eye. Learning how to apply it is often time-consuming. Besides, your team may become reluctant to introduce an unfamiliar tool into their workflows and, as a result, show lower productivity during the integration process.
But considering the efficiency-boosting effects of high-quality hour tracking software, the above risks are worthwhile. And for those just starting to explore such a user-friendly time tracker as actiTIME, these risks are incredibly low.
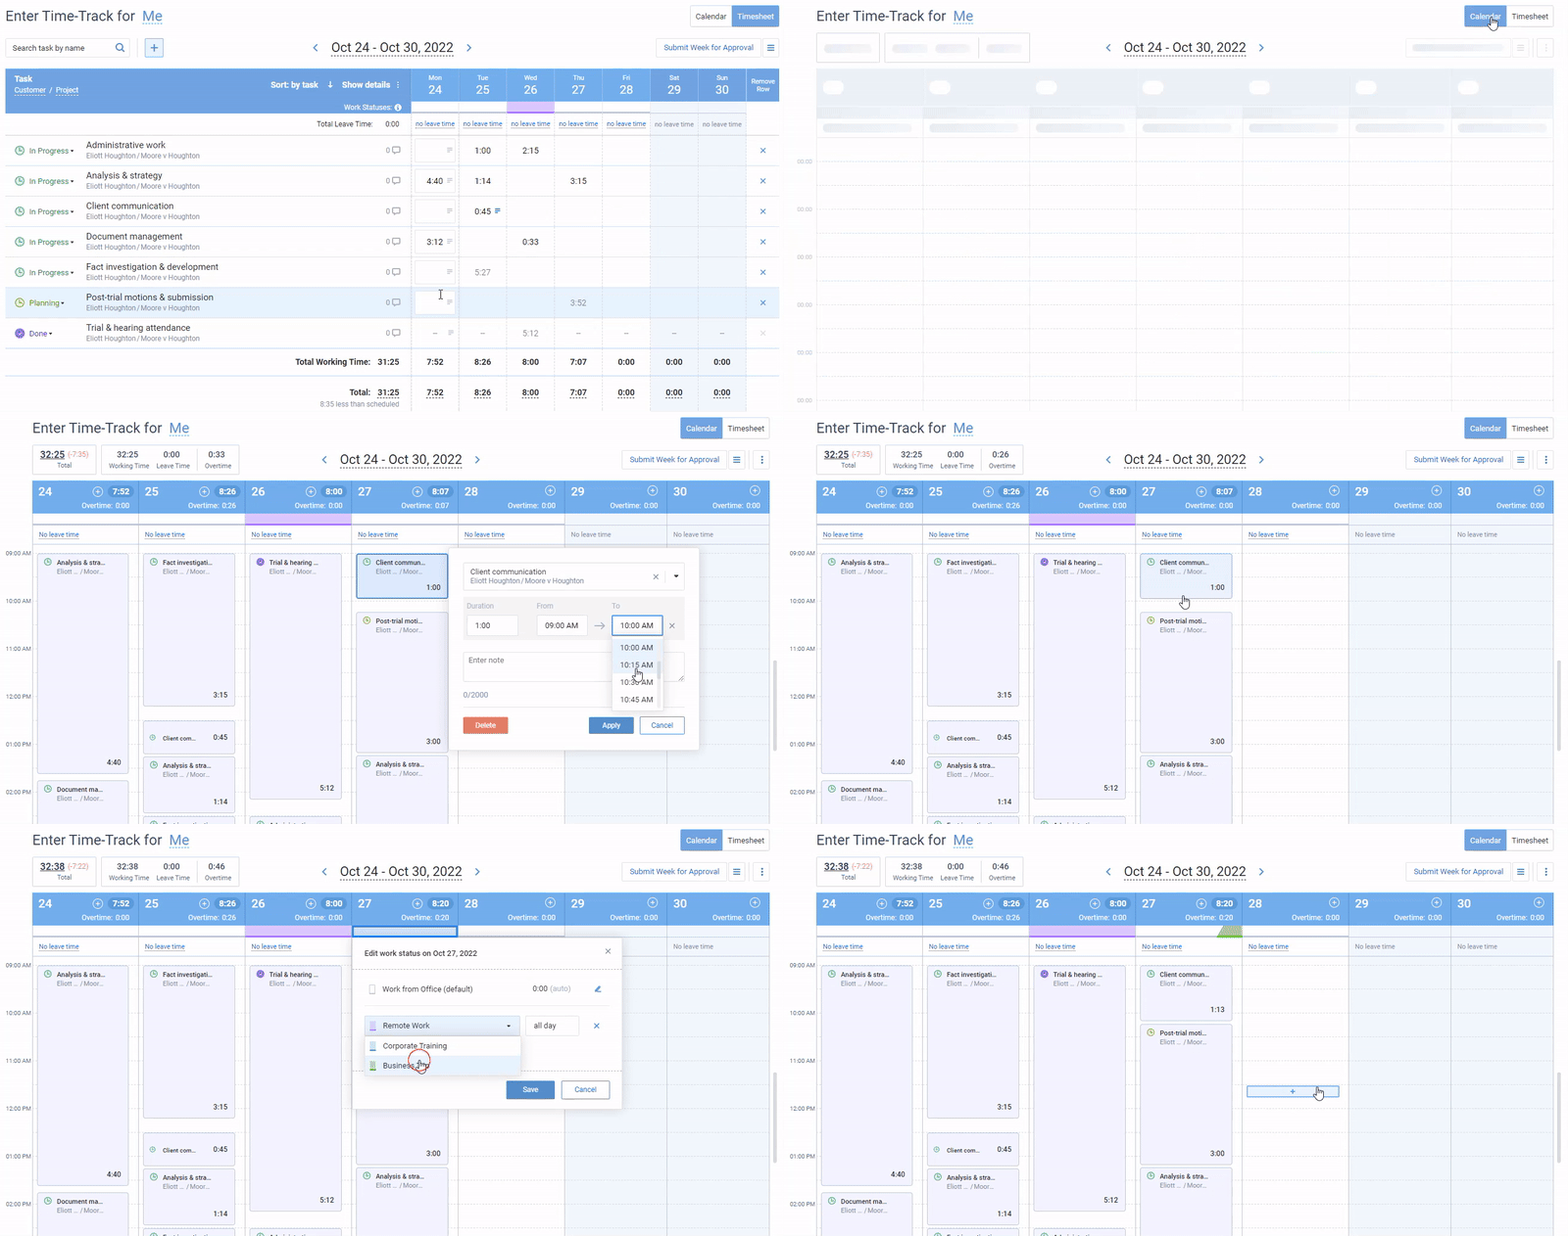
Track time in actiTIME by entering task duration or logging start and end times of tasks using online timesheet or weekly timeline view
Straightforward and intuitive weekly timesheets are actiTIME’s core functionality. They are so simple to understand that it’s hard to go wrong when working with them. However, to commence logging hours with this tool, you first need to add at least a few tasks to your account and also configure your Time-Track Hierarchy. We will walk you through these processes in this article. And additionally, we will discuss some less obvious software features that will make your actiTIME more convenient to navigate and your overall hour tracking experience more satisfying.
Let’s begin with a short introduction to actiTIME and its benefits for your professional life.
What Is actiTIME and What Can It Do?
As a smart online timesheet tool with some robust reporting features, actiTIME empowers users to do the following things:
- Keep a precise record of working time,
- Automate a variety of routine tasks and management processes (from client billing and overtime tracking to absence management and cost control),
- Handle workloads and organize tasks in the most efficient manner,
- Stay in the know of current project progress,
- Make more accurate task estimates and avoid project overruns,
- Find effective solutions for productivity improvement,
- Enhance team performance without micromanagement,
- Save time, reduce expenses and promote a better use of resources in order to activate the full potential of your business.
If any of the above points is something you’re striving for, then actiTIME is the right choice. And here’s how to configure and start using it to your full advantage:
5 Steps to Successful Hour Tracking with actiTIME
1. Edit your Time-Track Hierarchy
The purpose of the Time-Track Hierarchy is to categorize your actiTIME tasks in the most convenient fashion. It consists of three levels: the top, the middle, and the time entry level with such corresponding default names as Customer, Project, and Task.
The lowest tier in the hierarchy includes the entities you’re going to track hours for (i.e., tasks). The second level (i.e., Project) will only be used to group tasks, whereas the highest one (i.e., Customer) will help to sort your projects.
Here’s how to discern which project and customer each task belongs to later on:
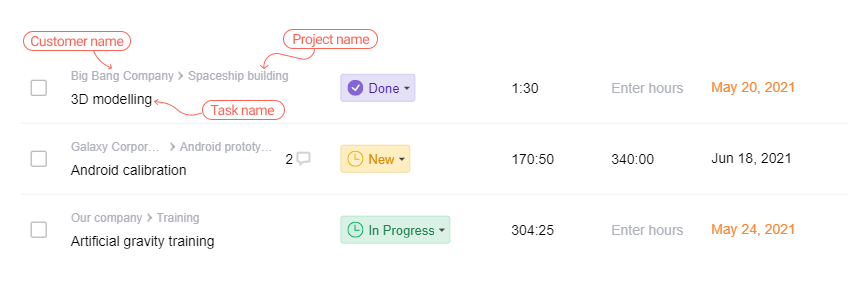
The best thing about actiTIME’s Time-Track Hierarchy is that you can easily change the name of every grouping level if you feel like it doesn’t reflect your work situation well. Just go to General Settings and choose one of the following options:
- Client, Customer, Product, Product Line, or Project for the top grouping tier
- Job, Product, Project, Release, or Task for the middle tier
- Task or subtask for the time entry level

And in case you find neither of the above alternatives suitable, you can always give the grouping levels unique custom names.
2. Create tasks to track time for
After the Time-Track Hierarchy is adjusted, it’s time to add some projects and tasks to your account. There are two primary methods for doing that:
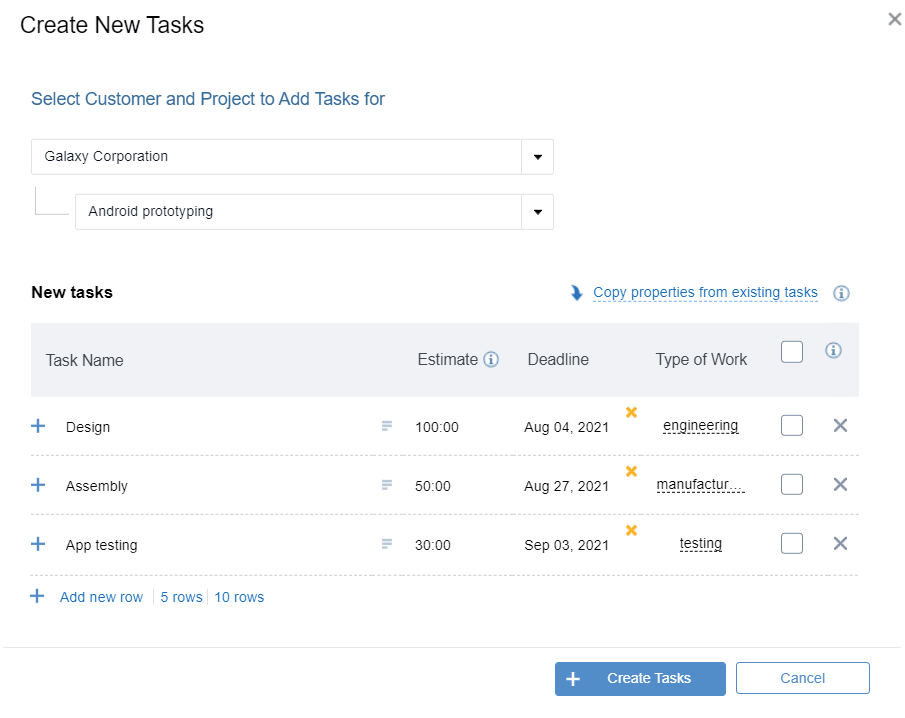
- You can create new customers, projects, and tasks one by one| Go to the Tasks tab, press on + Add New and select which entity you want to create: Customer, Project, or Task. Fill in the required info in the opened form, e.g., task names, estimates, deadlines, etc. Then, click on the + Create button to save the new entity. Afterward, you will also be able to add new tasks to your account by simply copying the properties of the existing ones.
- You can import the info on customers, projects, and tasks in bulk | Create an Excel table with all the necessary project / task data, save it as a CSV file and upload to actiTIME. Once done, you will be able to add the imported tasks to the timesheet and start time tracking right away. To proceed with this quick and efficient task creation method, follow this route: Tasks 🡪 + Create New 🡪 Import tasks from CSV.
3. Invite your team to actiTIME
Another important step to successful time tracking is to gather your colleagues in actiTIME and allocate the created tasks to them. Doing that is very simple:
- To invite employees one by one, click on the Users tab and press + New User.
- Fill in the required information in the Account Settings form: enter a team member’s name, email, and hire date; indicate which department they’re from; modify their work schedule if necessary and set a pay rate for them.
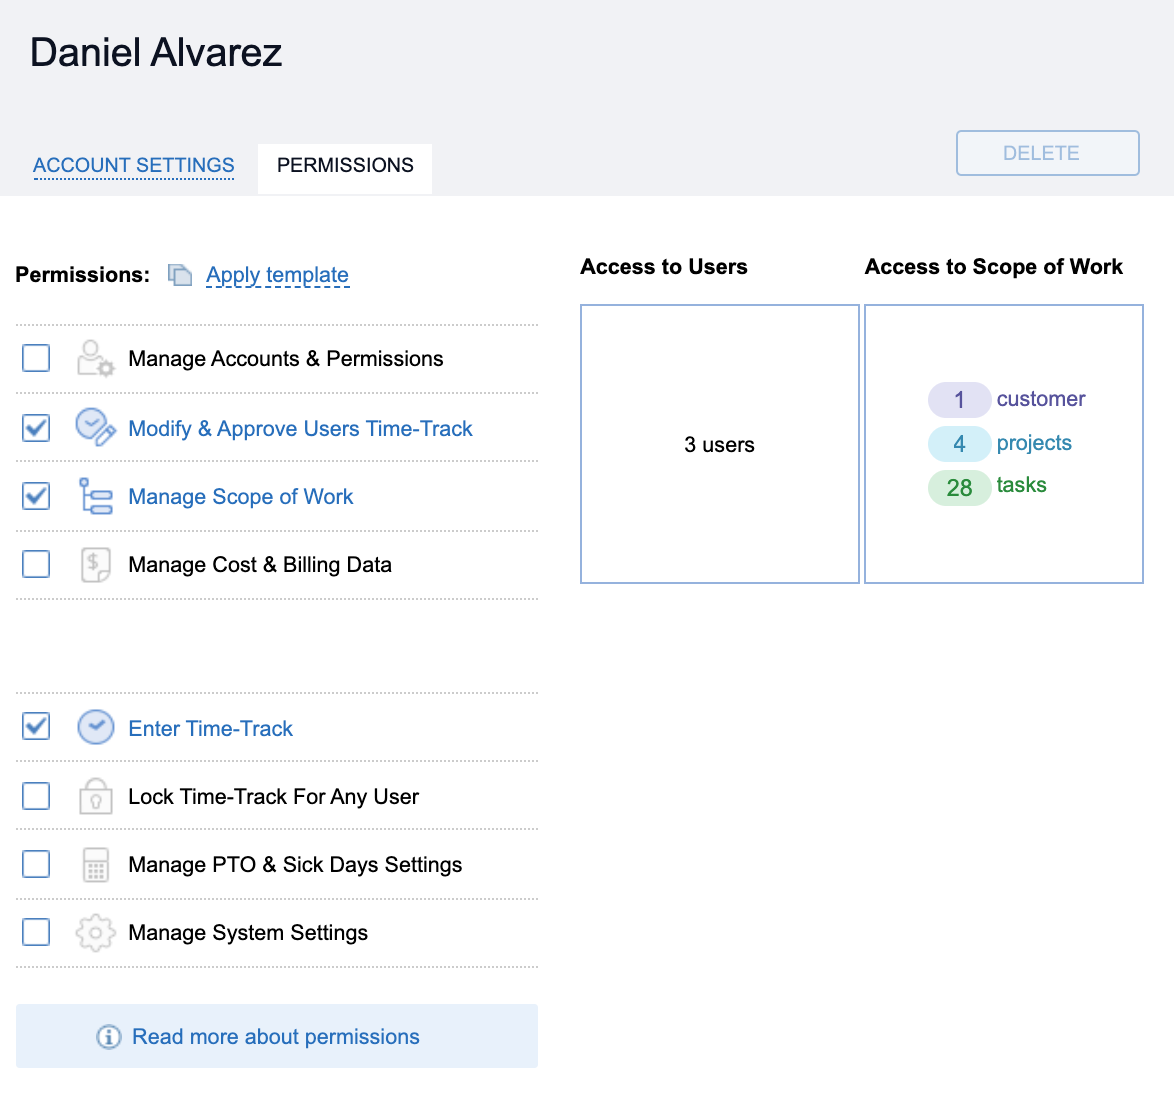
- Afterward, go to Permissions and choose which actiTIME features and types of data this user will be able to access. For instance, the “Enter Time-Track” permission is suitable for regular employees who will merely apply actiTIME to log their working time and review personal records. And the “Manage Scope of Work” permission is appropriate for team leaders who need to add new tasks to the system and monitor the work progress of their direct reports.
- Once you’re done configuring a new user account, hit Save & Send Invitation – an email with all the login details will go straight to your colleague’s inbox right away.
Apart from this, you may always send out invitations in bulk, which is particularly handy when you’re just starting to use actiTIME and need to onboard your entire team fast. To employ this method, simply locate the Bulk Invitations button and fill in the required information in the form it takes you to:
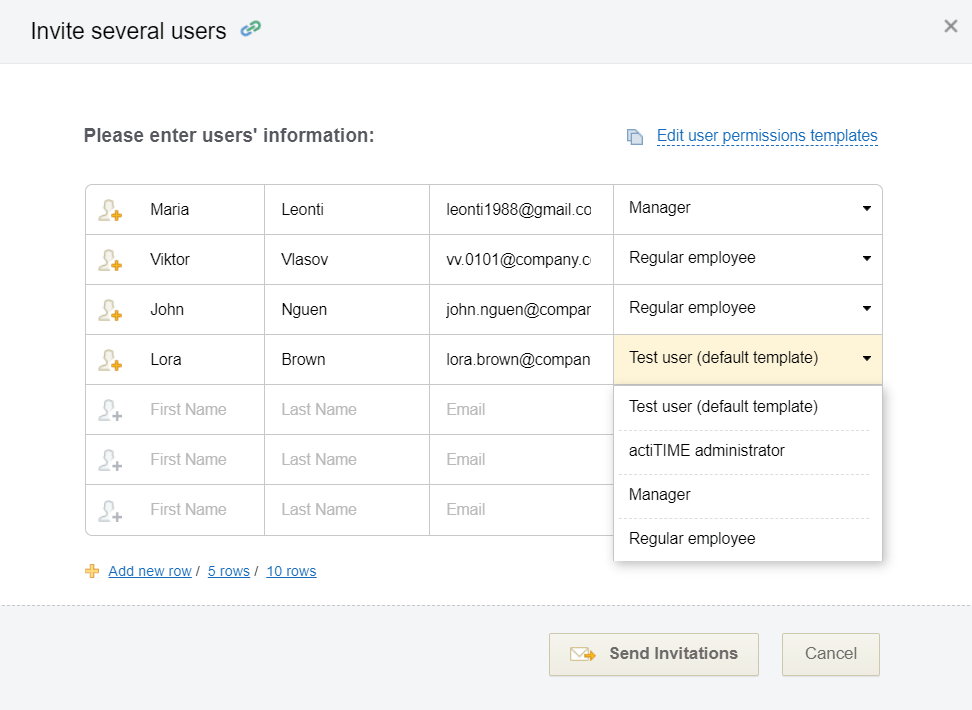
When everyone is on board, don’t forget to assign the created tasks to users – after that, time tracking may begin!
4. Switch off unnecessary features
actiTIME has a highly flexible configuration, which makes it perfectly adaptable to unique policies and workflows in any organization. For example, you can turn off the features and functions you don’t plan to make use of. For that to happen, just open product settings and click on Turn Features On / Off to see and choose your options. By concealing unnecessary functionality this way, you will secure a distraction-free and more enjoyable software experience.
5. Download the browser extension and the mobile app
If you’re a big fan of automation and prefer not to be bothered with manual data entry too often, actiTIME’s browser extension – aka Time Management Assistant – has got you covered!
This handy tool takes care of the nitty-gritty details of monitoring where you go and how long you stay on different websites, so you can focus on what matters most – being your productive self. And thanks to quick installation and an intuitive configuration, you’ll barely need to lift a finger before Time Management Assistant gets to work.

In addition to fully automated activity tracking, this little efficiency-boosting gem includes a one-click timer for those times when you need to take more control of your time tracking process. Plus, with customizable data export rules that seamlessly integrate with your actiTIME account, you can say goodbye to any export-related hassle or frustration.

Last but not least, Time Management Assistant offers insightful visual reports that let you feast your eyes on beautiful, easy-to-read graphics and make analyzing your performance results an absolute breeze.
Simply download the extension here and check all these awesome features in action – it’s absolutely free to use!

On top of the above option, you can automate time tracking using one-click timers in the mobile app, which also allows for hour tracking in the offline mode. So, even if the internet connection is unstable, you and your team members can still make time entries without a hitch. All the submitted data remains saved in actiTIME Mobile for as much as needed and, immediately after you’re back online, it gets synced with your main account and becomes available for review there.
Need some help with configuring your actiTIME and learning about its plentiful features? Feel free to book a demo tour with our product experts. They will provide you with valuable information on how to make time tracking work to your advantage and will leave neither of your questions unanswered.
And if you’re still not subscribed to actiTIME, sign up for a free trial here.


