actiTIME QuickBooks Integrator
actiTIME QuickBooks Integrator is a simple online application that allows you to import your time records from actiTIME into QuickBooks.
Cut down on manual data entry and streamline your bookkeeping process by connecting actiTIME to your QuickBooks Online account.
Compatibility
QuickBooks Compatibility
Supported Products: QuickBooks Online (Essentials, Plus and Advanced)
Required Settings: Time tracking functionality must be turned on
Required Level of Access: Admin
actiTIME Compatibility
Supported Versions: actiTIME Online (excluding free version) and actiTIME Self-Hosted 2020 or newer
Required Settings: The Types of Work feature must be turned on
Required Level of Access: Admin (must have “Manage Accounts & Permissions” and “Manage Cost & Billing Data” permissions)
How It Works
actiTIME QuickBooks Integrator provides a one-way import of your time records from actiTIME into QuickBooks.
In other words, any changes made in actiTIME can be easily carried over into QuickBooks, but not the other way around.
To perform an import you need to set up import rules (or mappings) first, where time tracked by actiTIME users against actiTIME tasks will be linked to specific QuickBooks employees and customers respectively.
Available Mapping Types
How to Get Started
This short video will show the process of importing your hours from actiTIME into QuickBooks with the help of our free Integrator app.
- Open the integrator directly from your actiTIME account.

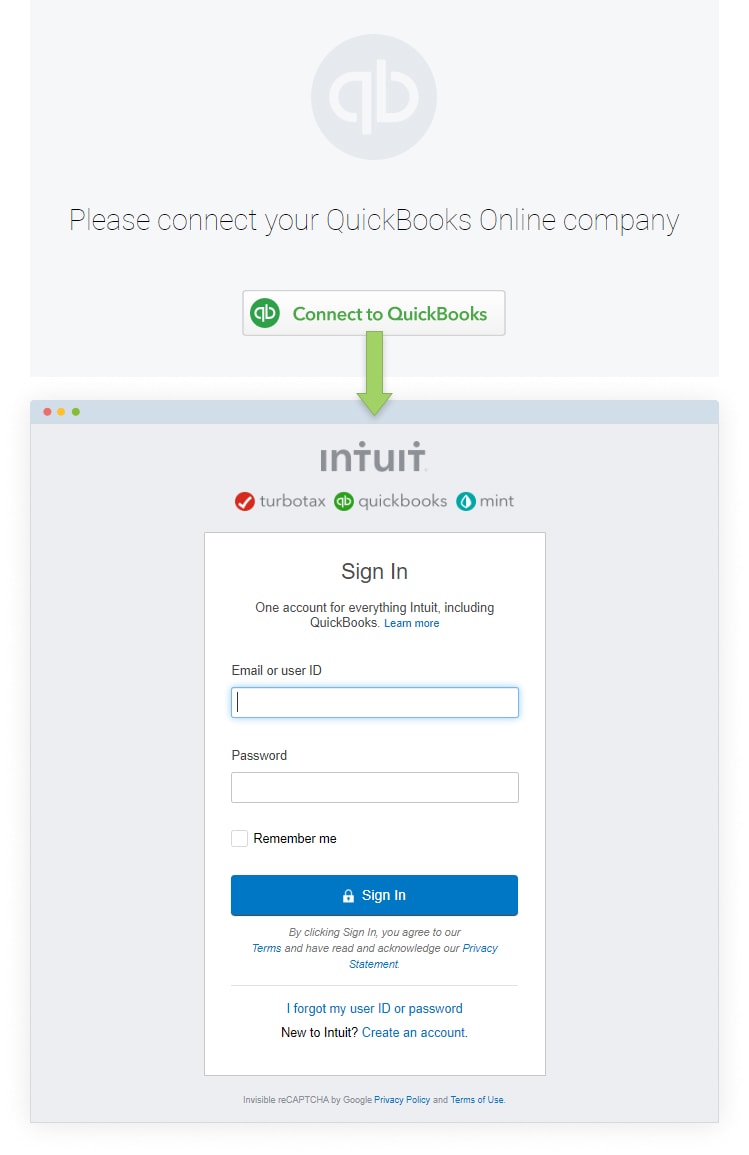
- Connect your QuickBooks account.
- If you have several QuickBooks companies, select which one you’d like to connect to.
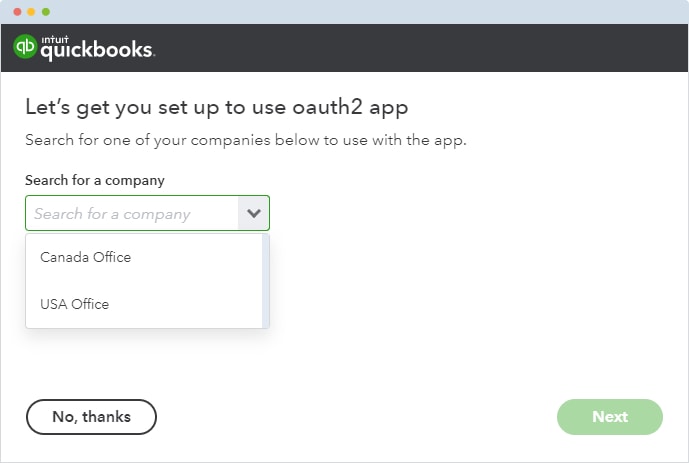
Click Next and Proceed to get back to the Integrator.
Now you’re ready to create your first import!
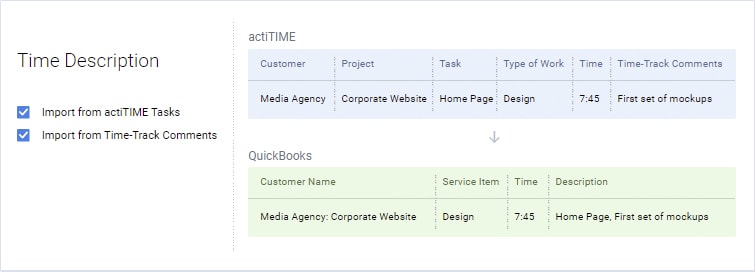
Before your proceed with your first import, be sure to review the Time Description Settings and adjust them as necessary.
Switching Companies
The actiTIME QuickBooks Integrator allows you to connect to multiple QuickBooks companies and import data from a single actiTIME account. Each QuickBooks company will have its own import history and settings.
To switch to a different company:
- Click on the name of the currently selected QuickBooks company in the upper left corner of the screen
- Click on the + icon and then Connect to another QuickBooks
- Follow the instructions on screen
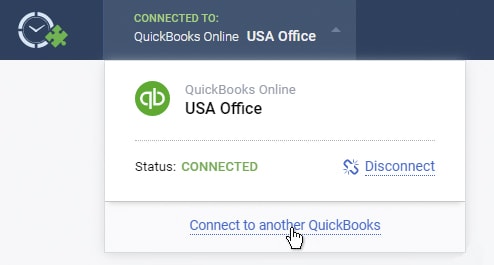
You can also disconnect from the currently selected QuickBooks company by clicking the Disconnect button. All of your settings and import history will remain available.
To change the actiTIME account you’re importing data from:
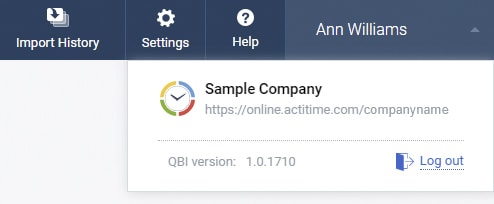
- Click on the name in the upper right corner of the screen
- Log out of the actiTIME QuickBooks Integrator
- Log back in using the address and credentials of your other actiTIME account
Mapping Settings
To access the actiTIME QuickBooks Integrator settings, click the Settings icon on the navigation bar.
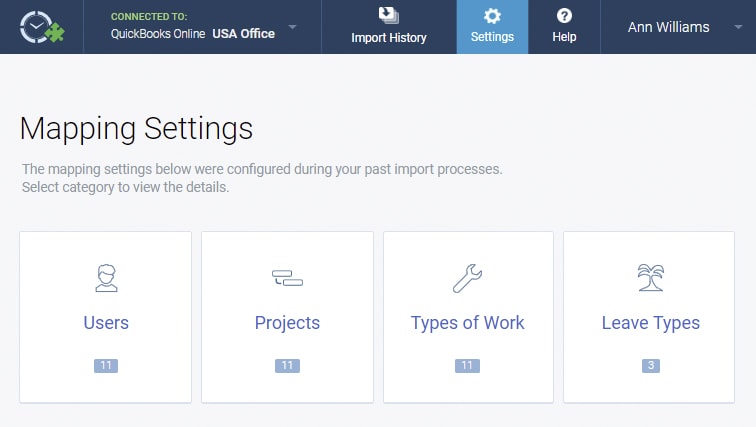
There are four mapping categories (or import rules):
- Users
- Projects
- Types of Work
- Leave Types
Click on a category to see the list of the current import rules.
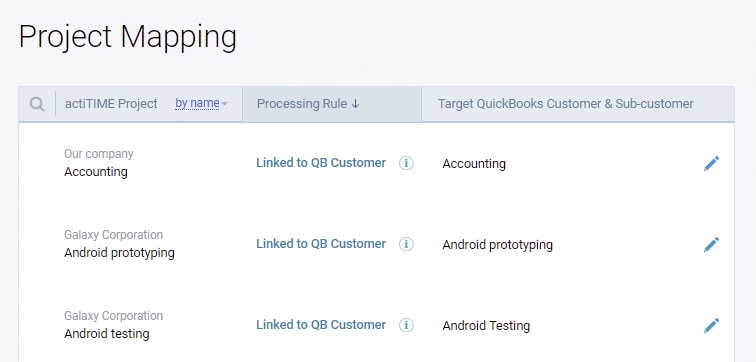
Import rules are created during the import process, and cannot be changed for the actiTIME entities that have not been imported before.
To edit an existing rule click on the ![]() icon, make the necessary changes and then click on the
icon, make the necessary changes and then click on the ![]() icon to save it.
icon to save it.
Any changes you make to the import rules will be applied to your future imports.
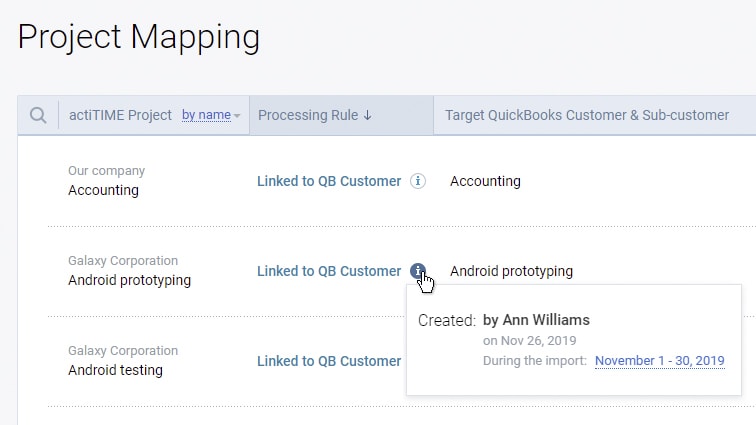
Mapping history can be viewed by clicking on the ![]() icon.
icon.
Time Description Settings
Time description settings allow you to choose whether or not to import your actiTIME task names and time-track comments into QuickBooks.
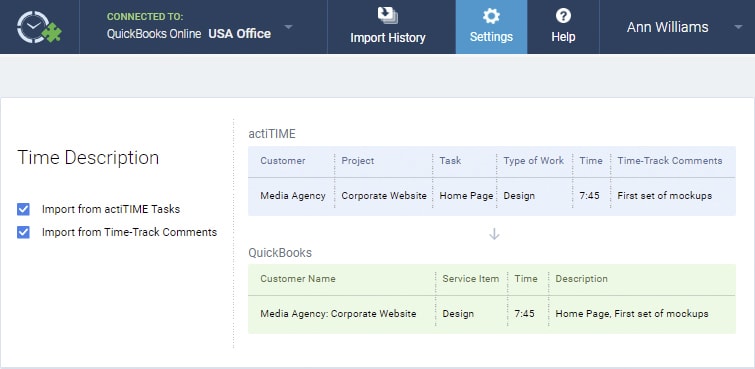
If neither option is selected, task names and time-track comments will be ignored. Multiple time records from actiTIME will be combined into a single QuickBooks time activity.
If you want your actiTIME records to be imported as separate QuickBooks time activities, be sure to select either one or both of these options.
Any changes made to these settings will be applied to your future imports.
Creating a New Import
It is strongly suggested that you only attempt an import when you don’t expect any further changes to be made to your data in actiTIME. You can only make corrections to the imported data as long as the corresponding time activities in QuickBooks have not been billed yet.
- To start a new import click New Import on the Import History page
- Select the data you’d like to import from actiTIME into QuickBooks
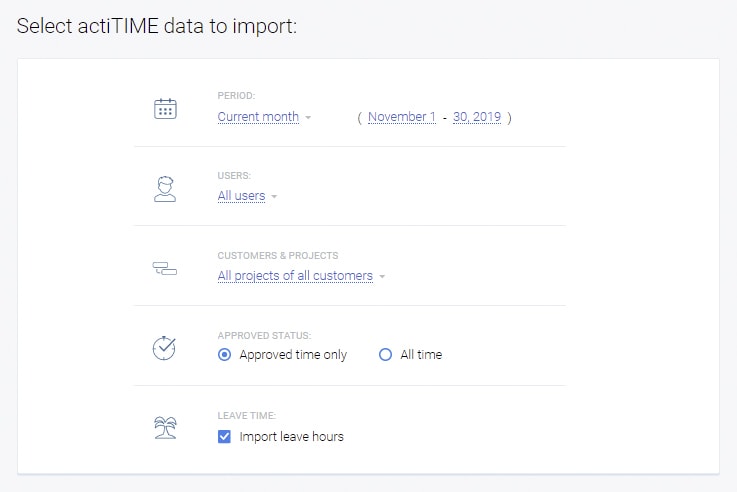
- Next, configure the import rules (mappings) for the data you selected on the previous step. After your import has been successfully completed these rules will be saved in the settings for future use. The Integrator supports the following types of import rules:
- Create new [QB Entity]
- Link to [Existing QB Entity]
- Do not import
You need to choose an import rule for each actiTIME entity so that the imported data is correctly linked to the corresponding entities in QuickBooks: employees, customers and service items.
To make the process easier the Integrator will try to find similar entities in both applications and pair them up automatically. You can edit the suggested mappings if necessary.
Imported actiTIME entities are divided into four categories:
- Users
- Projects
- Types of Work
- Leave Types
Users
This section allows you to link actiTIME users to your QuickBooks employees (one-to-one relationship).
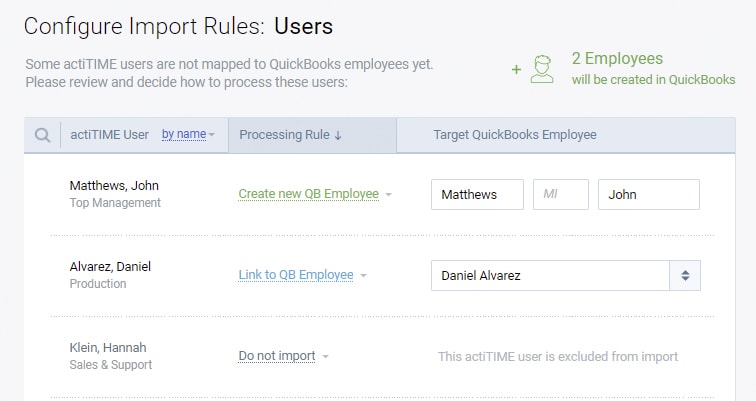
- If the Create New QB Employee rule is selected, all time entries submitted by the selected actiTIME user will be imported to the newly created QB employee. You must enter the name of the new QB employee if you select this option. Please note that the Create New QB Employee rule will not available if the Payroll functionality is turned on in the connected QuickBooks account. If you need to link an actiTIME user to a new QuickBooks employee, create a new employee in QuickBooks fist, then select the Link to QB Employee rule and refresh the list of available employees. Your newly created QuickBooks employee should appear on the list.
- If the Link to QB Employee rule is selected, all time entries submitted by the selected actiTIME user will be imported to the selected QB employee.
- If the Do not import rule is selected, time entries submitted by the selected actiTIME user will not be imported into QuickBooks.
Projects
This section allows you to link actiTIME projects to your QuickBooks customers and sub-customers (many-to-one relationship).
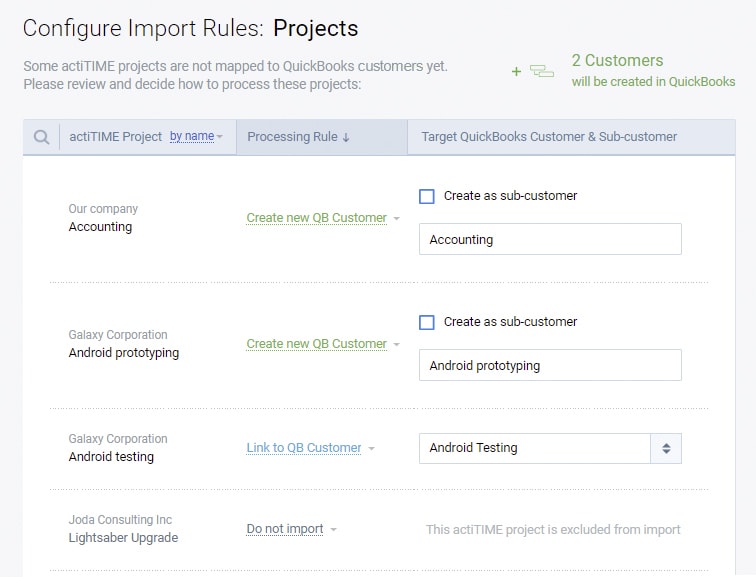
- If the Create New QB Customer rule is selected, all time entries submitted against the selected actiTIME project will be imported to the newly created QB customer / sub-customer. You must enter the name of the new QB customer / sub-customer if you select this option.
- If the Link to QB Customer rule is selected, all time entries submitted against the selected actiTIME project will be imported to the selected QB customer / sub-customer.
- If the Do not import rule is selected, time entries submitted against the selected actiTIME project will not be imported into QuickBooks.
Types of Work
This section allows you to link actiTIME types of work to your QuickBooks service items and sub-services (many-to-one relationship).
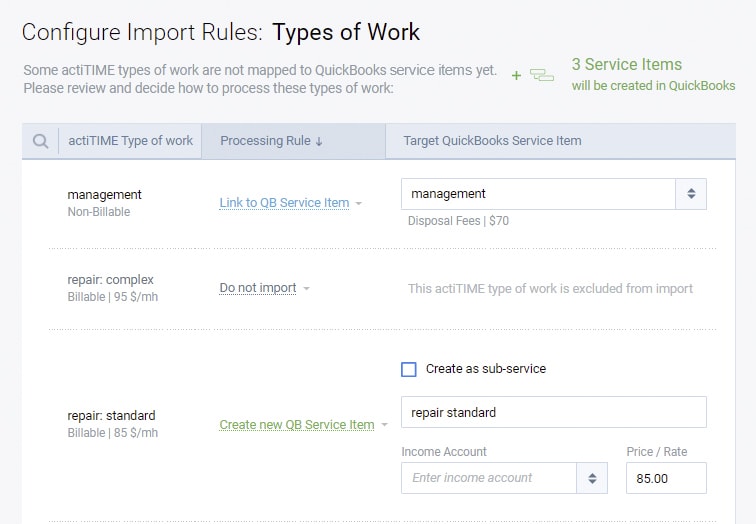
- If the Create New QB Service Item rule is selected, all time entries submitted to a task or tasks with the selected type of work in actiTIME will be imported to the newly created QB service item / sub-service. You must enter the name of your new service item / sub-service and specify the Income Account and Price / Rate values.
- If the Link to QB Service Item rule is selected, all time entries submitted to a task or tasks with the selected type of work in actiTIME will be imported to the selected QB service item / sub-service.
- If the Do not import rule is selected, time entries submitted to a task or tasks with the selected type of work in actiTIME will not be imported into QuickBooks.
Please note that the billing status of your imported QuickBooks time activities will depend on the billable / non-billable category of your actiTIME type of work.
If the Hourly Billing Rates, Invoices and Profit / Loss Report feature is turned off in your actiTIME, then no actiTIME billing rates will be visible on this page.
Leave Types
This section allows you to link actiTIME leave types to your QuickBooks service items and sub-services (many-to-one relationship).
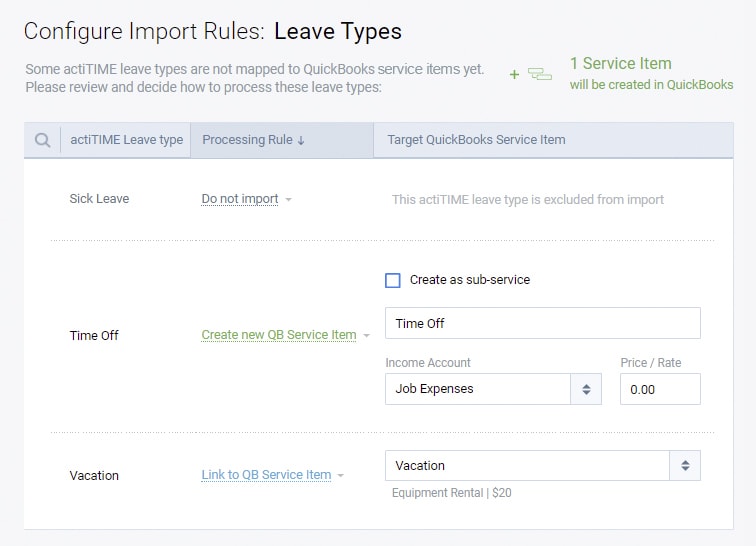
- If the Create New QB Service Item rule is selected, all hours submitted against the selected actiTIME leave type will be imported to the newly created QB service item / sub-service. You must enter the name of your new service item / sub-service and specify the Income Account and Price / Rate values.
- If the Link to QB Service Item rule is selected, all hours submitted against the selected actiTIME leave type will be imported to the selected QB service item / sub-service.
- If the Do not import rule is selected, hours submitted against the selected actiTIME leave type will not be imported into QuickBooks.
When you are finished setting up the mapping rules, click Confirm Mapping & Continue to move on to the next step.
- Preview the import data to make sure that everything is set up properly.
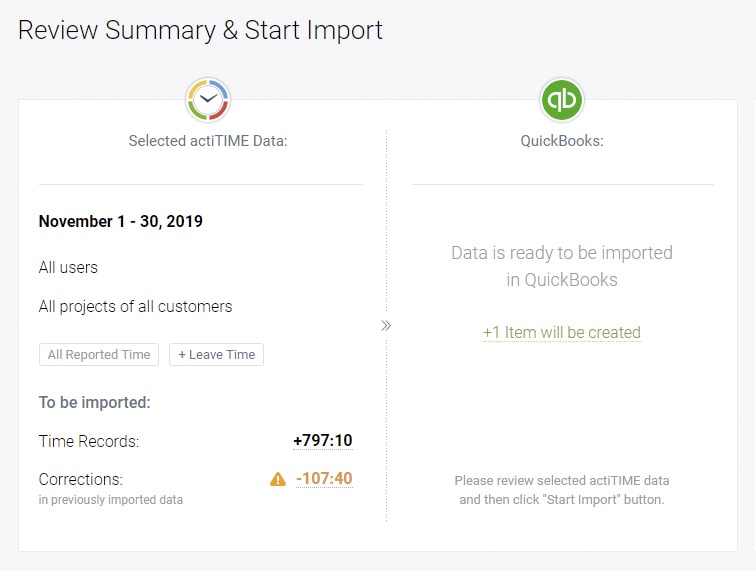
You can preview a detailed summary of your imported time records:
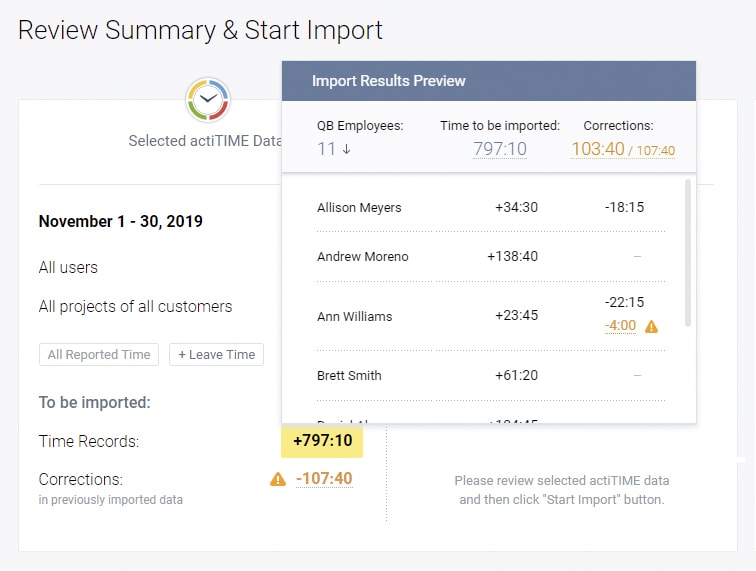
You can also see a preview of all items that are going to be created in QuickBooks during the import:
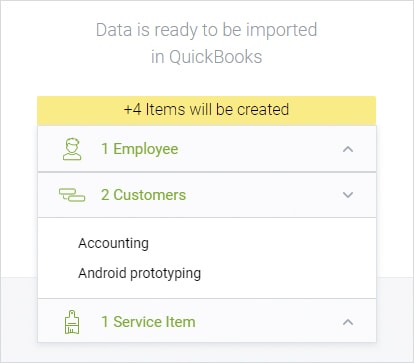
Before you start the import you can go back to any of the previous steps and make any corrections.
When everything is set up and ready, click Start Import to initiate the import process.
- Review your import progress. Once initiated, the import process will run in the background, so feel free to leave the page. The time it takes to complete your import will depend on the amount of imported data. You can interrupt the running import at any time by clicking Interrupt. Note that an interrupted import cannot be resumed, so will need to run a new import with the same configuration to import the rest of the data. When the import is complete, you can review the summary of the imported data in the Integrator or directly in your QuickBooks account. Clicking Done will take you to the Import History section of the Integrator app.
Import History
The Import History section contains a detailed record of all imports performed between the current actiTIME account and the connected QuickBooks company. You can review the imports performed both by you and other users.
An import can have one of the following statuses:
- Completed
- Interrupted
- Error
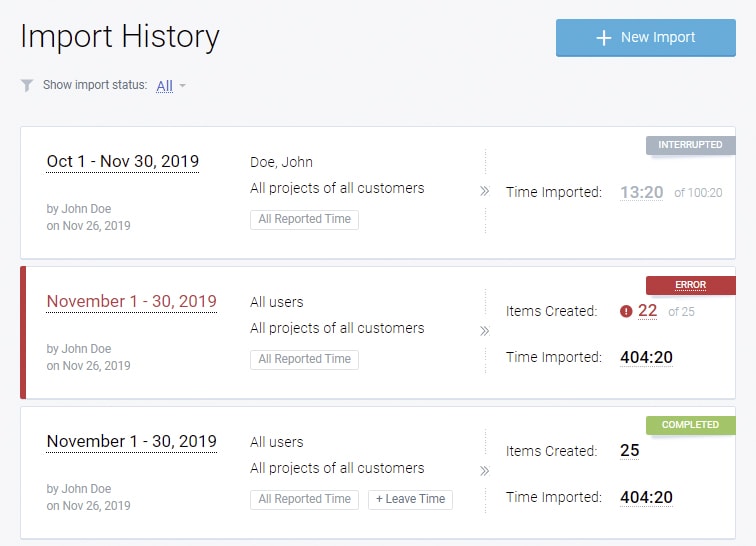
Your most recent imports are shown at the top, and you can sort them either by their status or by users who performed them.
For every import, you can review the list of imported time records and created items, and check the status of each individual item.
If there were any issues while importing a specific item, clicking on the status icon will show you the details:
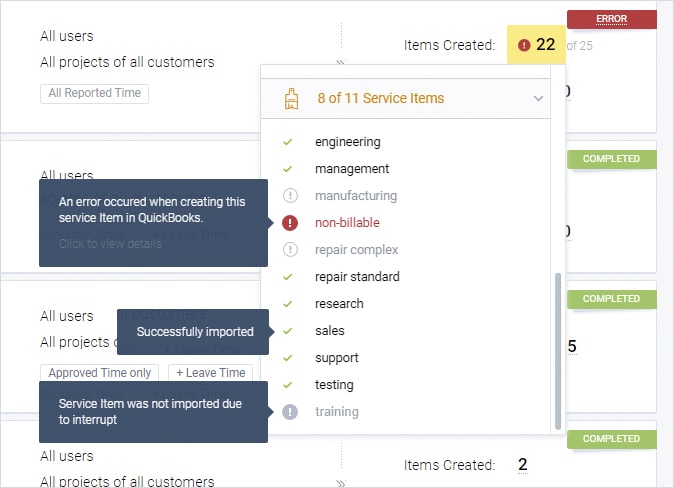
Clicking on the date range will allow you to see a more detailed breakdown of the selected import, as well as review the mapping settings that were used during the import.
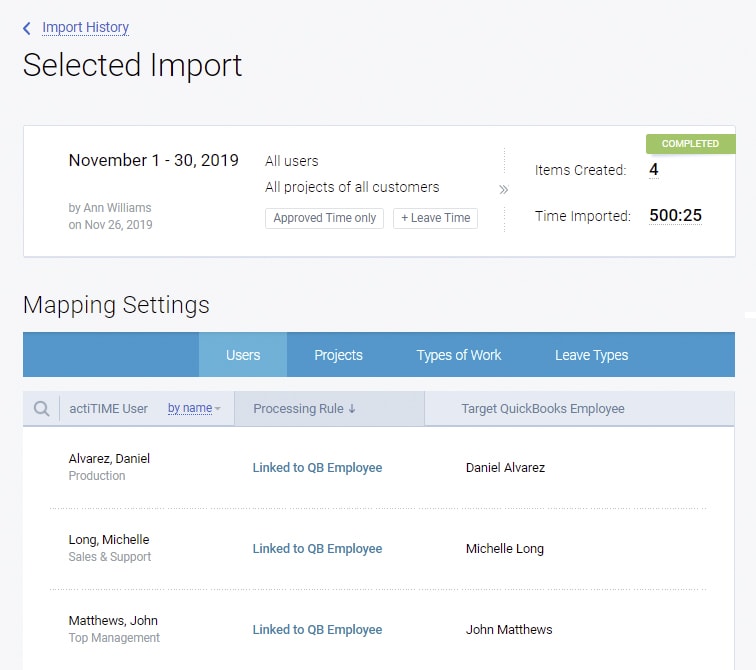
Any import that you’re currently working on is only visible to you and cannot be edited or discarded by any other user. However, other users can configure their own imports at the same time.
If there is an import currently in progress, it will be visible to all users but cannot be interrupted by anyone other than the user who initiated it. Other users cannot start their own imports while another import is still in progress.
Making Corrections
It is strongly suggested that you only attempt an import when you don’t expect any further changes to be made to your data in actiTIME.
If you do need to make some corrections to your time entries in actiTIME after you have imported the data to QuickBooks, you can run the import again with the same configuration and the Integrator will update the data in QuickBooks accordingly.
Examples of possible corrections
Updating specific Mapping Settings and repeating an import can also cause significant changes in the imported data:
- If the mapping rule for a specific entity is changed to Do not import, repeating the import will lead to the deletion of the time activities associated with this entity in QuickBooks for the selected time period.
- If the mapping rule for a specific entity is changed to Link to [Another Entity], repeating the import will lead to the deletion of the time activities associated with the old entity and to the creation of new time activities associated with the new entity in QuickBooks for the selected time period.
Remember that you can always review all the corrections during the preview step before starting the import.
Still have questions? Let us help you.


